
Cpu Path Tracer
Just under three years ago, I wrote a little Ray Tracer using C++. The goal was to write a simple Ray Tracer without diving into shader programming. My rationale being that coding for the CPU is generally simpler, more flexible, and easier to debug.
The project was very crude, having only a single material type, no reflections, etc. I was purely concerned with rendering an image, and not on the quality of that image. The project also only utilised a single thread.
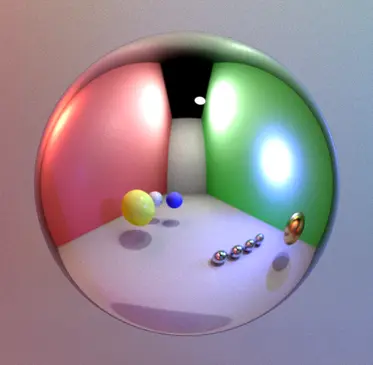
Three years later, and a few weekends of hacking, I managed to render the following image in 42 minutes. It took 20 threads on a Ryzen 7950X3D CPU, and involved 2048 samples per pixel, with a max bounce depth of 4.
While not perfect, I’m really happy with the final result. It’s a significant improvement on my last venture into this topic, and in this post we’ll talk about path tracing in general, but also the specific optimisations that ultimately lead to halving the render time.
Ray Tracing vs Path Tracing
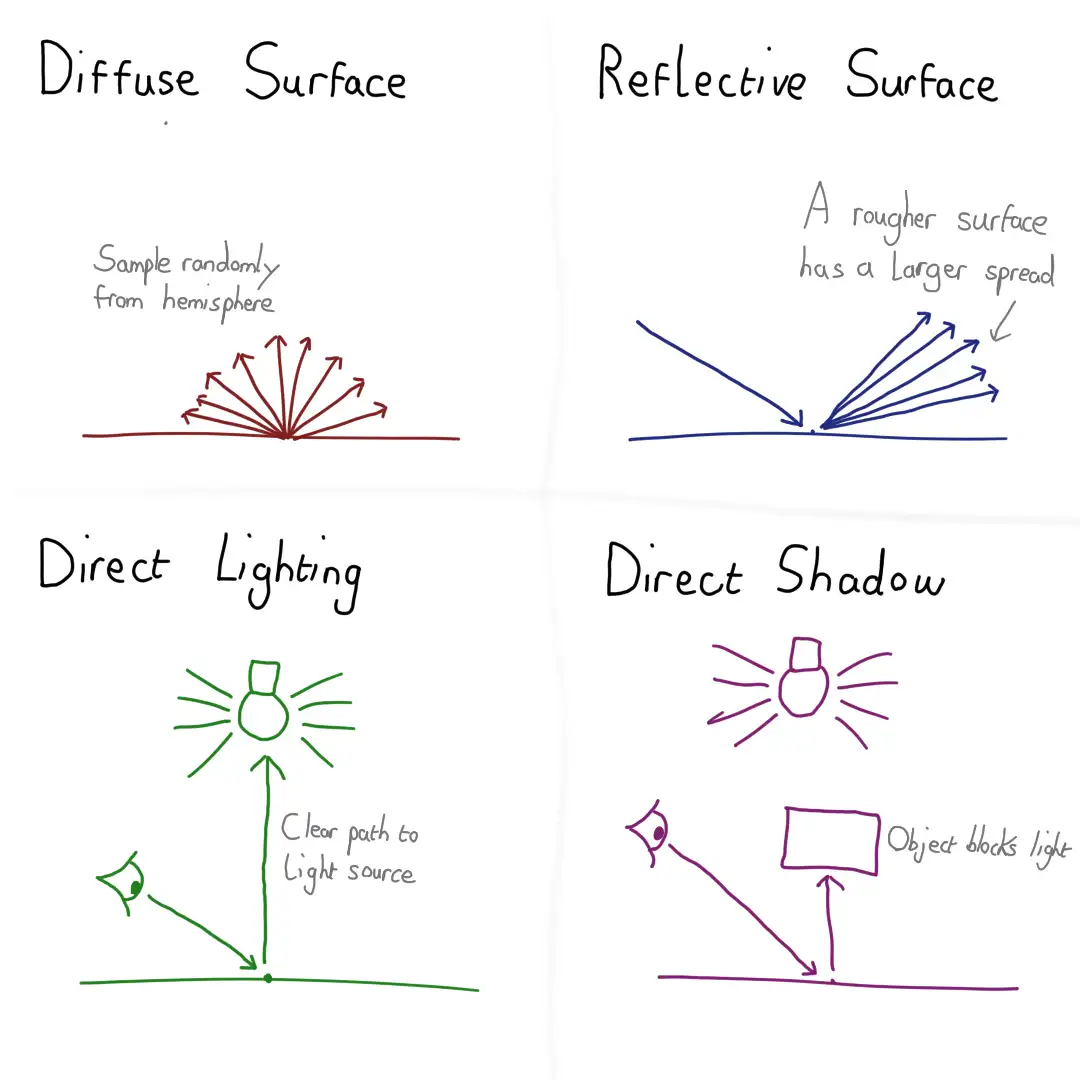
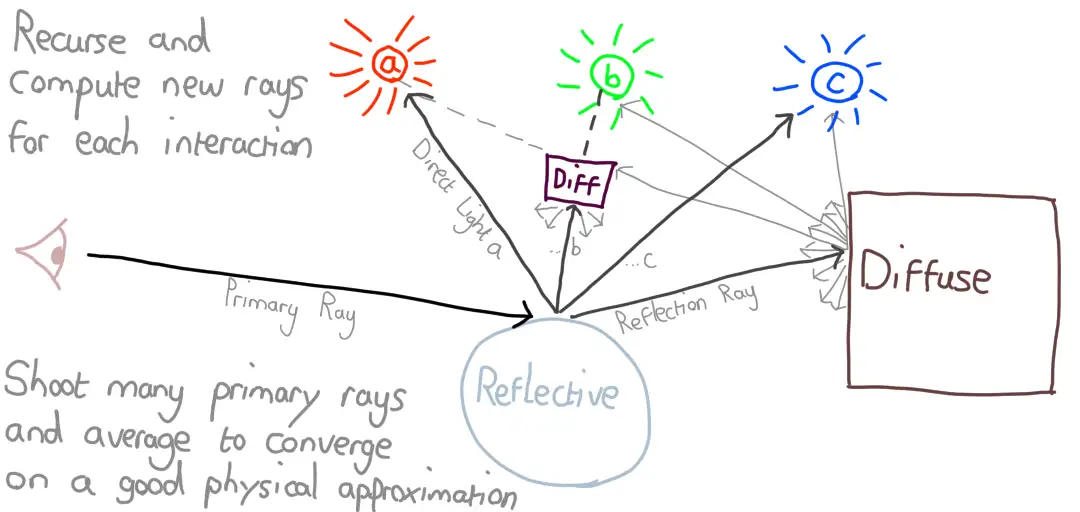
In Ray Tracing, rays are shot out from the camera into the scene. Each ray is tested for collision against every object in the scene, and the nearest collision point is recorded. Rays are then shot from the collision point to all major light sources in the scene, determining if that point is in shadow with respect to each light source.
Path tracing attempts to go further and simulate full global illumination. A new Ray is chosen based on the collision point, angle of impact and the material. Assume a Ray hit a very smooth metal sphere that is highly reflective. The code will give a high probability to an almost perfect reflection ray being chosen, and it will follow that new Ray. This process repeats, recursing until a given depth of rays, essentially creating a path that determines a single contribution colour for that pixel. A large number of samples are then taken for the same pixel and all the resulting contributions are averaged to get a final result. The more samples you take, the more accurate the final result.
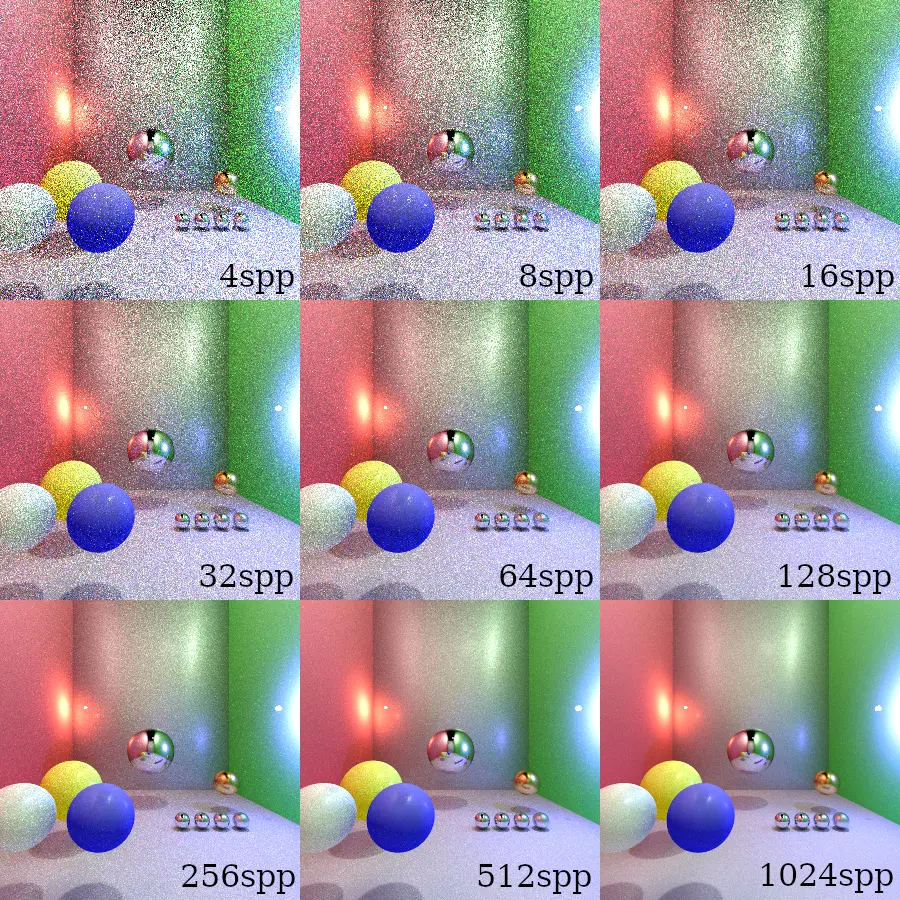
Below we can see the result of this process with a different number of samples per pixel (SPP). It should be noted that each sample in this context refers to how many primary rays were shot from the camera for each pixel. It is not the total Ray count, which is considerably higher after taking into account tests against light sources at each bounce and the standard random bounce.
From C++ to Rust
It’s all too easy to pick a language for ideological reasons. My original Ray Tracer was written in C++. At the time, it was the language I had the most experience with in cases where performance is critical.
My go to language for side projects these days is Rust, which happens to also be very performant. I figured that porting the project would be a good way to become familiar with the code again and it turned out to be fairly straight forward, taking only two evenings. The decision to write my own Vector and Quaternion functionality this time was certainly controversial, but I didn’t need too much functionality and I thought it would further my Rust knowledge, as I haven’t previously implemented traits that work with operators, similar to operator overloading in C++.
Fearless Concurrency
I built a new PC last year, opting for a more powerful CPU than usual. My original justification was that it would be great for doing more work with Docker. Ray Tracing is another solid use case, but it’s also true that the Nerd in me just wanted it after making the budget choice in my last 2 builds.
My original program was single threaded and slow, resulting in a painful developer experience. One of Rusts strengths is making multi threaded programs easier to write, and with my new 16 core processor, I was keen to take advantage, for my own sanity if nothing else.
Ray Tracing and Path Tracing are both highly parallel, as each pixels colour can be computed without knowledge of the other pixels. GPUs are an excellent fit for this, but as I mentioned earlier, it’s easier to write a CPU version, and it’s more flexible for experimentation. My main concern here though was time management. I have little time these days, so using 20 threads to make something take 3 seconds instead of a minute was a necessity.
As The Late Dr. Dave Harrison of Northumbria University once proclaimed “Waste the processors time, not your own”.
Building the Path Tracer
 Building the first version turned out to be relatively straigtforward. The great thing about Path Tracing is that the algorithm is rather simple to understand, it’s just insanely demanding on compute power.
I experimented a little with casting multiple rays at each level of depth, but ultimately I settled on following a single path for each sample. The only exception to this is scene lighting. The main lights in the scene generally have the greatest influence on the output colour of a given pixel, assuming that pixel is not in shadow.
We could wait for a Ray to hit a light by chance, but we’d need a large number of Rays to make sure this happens, costing us a lot in performance. A common technique, and what I opted for, was to cast multiple rays towards each light source on each bounce. This allows us to cast fewer rays overall, but care is needed to prevent these Rays from overpowering all indirect contributions.
While I claimed the development was straightforward, I did run into some issues. I had a fun bug in my Quaternion maths that took a while to track down, and some places where I wasn’t correctly calculating the contribution a given ray should have. All of this is part of the fun, and I’ve included some images below of the Path Tracer at various stages of it’s developement.
The Result
Once I completed the first version, I timed how long it took to render a 720p image, at 100 samples per pixel (SPP). Rather fortuitously it took just over 1 minute, averaging 60376ms to be precise. This will be the starting point I use in the Second half of this post that is focused on optimisations.
Optimisations
Spatial Partitioning (Octree)
Path Tracing is expensive because you have to cast a large number of rays, and the majority of those require collision checks against every object in the scene. To handle this, I implemented a quick and dirty Octree, and I mean dirty. The scene was split into eight cubes. If a ray did not intersect with a given cube, then it does not need testing against any volume completely enclosed by that cube.
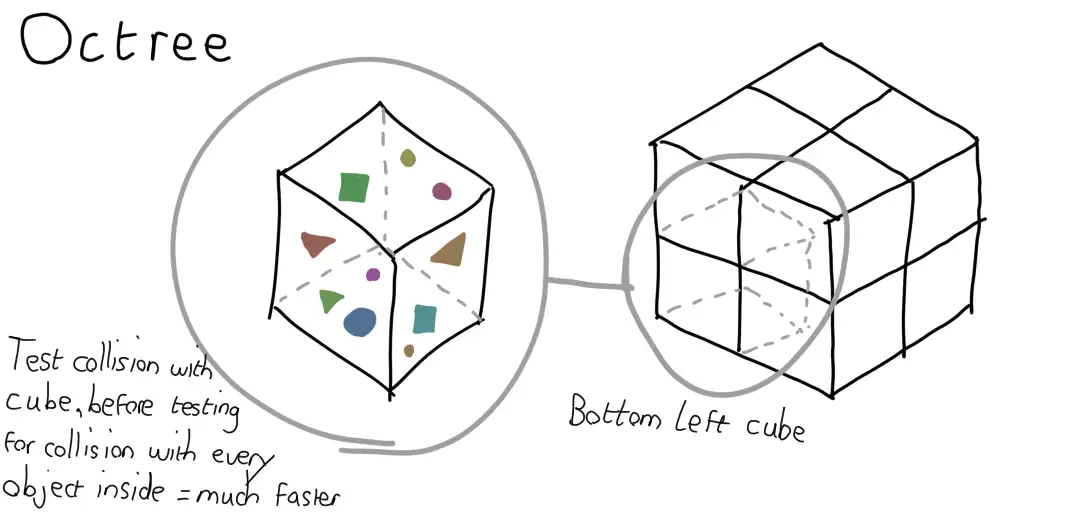
The fancier version of this idea is called bounding volume hierarchies, but I wanted something quick to implement before going any deeper. I did have concerns that it wouldn’t provide much speed up, given how few objects are in my scene, but the result was surprising. Not only were some of the walls visibly infront of the spheres, it took a full 90013ms to run, 50% slower.
My initial buggy version didn’t account for walls extending to 4 cubes each. Even fixing for that, the cost of traversing and intersecting my cubes was actually higher than the brute force approach. While I still believe the performance would be greatly improved in a scene with a larger number of smaller objects, I wasn’t settling for this result.
Bounding Volume Hierarchy
Bounding Volumes Hierarchies are not too disimilar from an Octree. The idea is to group scene objects that are close together inside volumes, and then test Rays against those volumes before bothering to run collision checks on the objects inside.
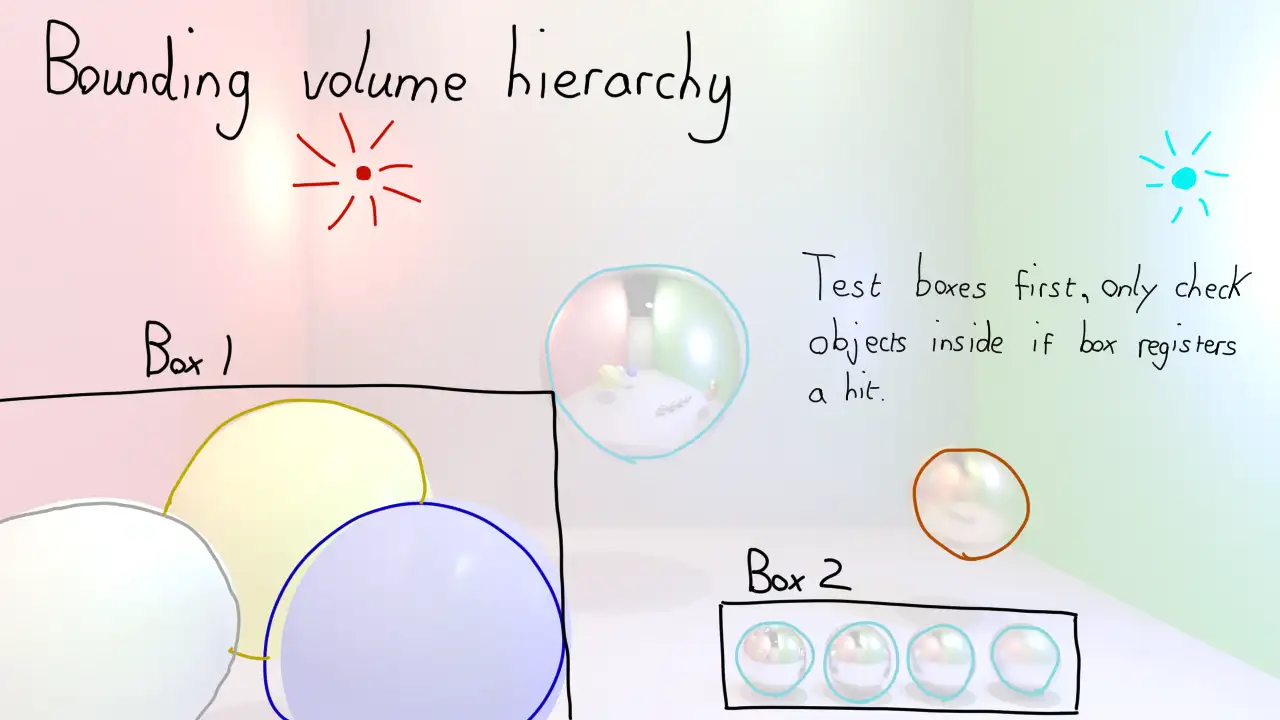
The really clever part is the algorithm that determines how objects should be grouped to get the best performance. I did not feel like writing a research paper on this topic, so I bravely decided to hard code my volumes. The four small ball bearings of varying smoothness were placed inside a single cuboid, as were the three ceramic balls.
The scene geometry meant that the walls could not be nicely grouped, but I hoped that cutting out seven scene objects for the majority of collision checks would make a big impact.
68274ms. Still slower than having no Spatial Partitioning at all, but far from the disaster that Octrees were. I managed to get this down a little bit by being smarter when recursing the tree to construct the list of test objects, fewer memory allocations, less cloning, that sort of thing, but ultimately it was still slower than no optimisation at all. I strongly suspect again that with more scene objects, this would pay off hugely, but as I had no plans to change my scene, I decided to turn off this “Optimisation” for the remainder of the project.
Caching Lighting
I had a suspicion that the bulk of my compute cost was coming from testing the direct lighting at each bounce. My scene contains three lights, and I was casting three rays at each for every collision. For fun, I disabled direct lighting. The scene was black, but it was black that only took 6268ms to render!
Finally I was right about something. I started to look at the lighting code, and wonder if I could cache results. Maybe I could somehow hash a given Rays position and direction. Ultimately all rays are likely to be at least slightly unique, but I could use a function that would provide the same hash for rays that were similar enough.
I tried a few iterations of this approach, and did manage to shave off a few seconds, but it was difficult to balance performance against weird visual results that came from using flawed data. Disappointed once again, I abandoned any idea of trying to cache lighting values. The huge number of hashes and lookups made it not worthwhile. Maybe with some tweaking and a faster hash algoorithm it might have some merit, but I decided to look for gold else where, though kept in mind that lighting may be ripe for plunder.
Value or Reference
Near the start I mentioned the controversial decision to write my own Vectors and Quaternions. Well for some insane reason I made everything expect a reference to a Vector, rather than copying the object. I probably thought that it would be faster than creating new objects, but this turned out not to be the case. Re-writing my Vectors to implement the Copy trait gave a nice speed boost of 4 seconds. Down to 56367ms. Finally some progress.
This progress came with a satisfying added bonus. My code now looked a lot more sane, with things like 0.001 * normal + direction rather than 0.001 * &(&normal + &direction) which had been grinding at my soul a bit.
Dynamic Dispatch
Dynamic dispatch is a mechanism supported by most object oriented languages. In Rust it is commonly used with Traits, which serve a similar role to Interfaces in other languages. Multiple types can implement a Trait or Interface, and the general idea is that as long as a type implements a given Interface, it can be used by something that requires that interface. A function that takes a Vehicle Interface might expect a Bike or a Car object that implements the interface.
The actual function that gets called is looked up at runtime, which provides a lot of flexibility, but it’s potentially slower than when the compiler knows the explicit types at compile time.
Static dispatch on the other hand means that at compile time, the methods are known, and potentially more compiler optimisations can be applied. Before this project, I’d never actually done a benchmark on this, though I usually veer towards dynamic dispatch just because I tend to prefer patterns like dependency injection that usually rely on it, and generally find it more flexible.
My code contained a Trait I’d called Collidable. Both my Poly and Sphere structs implemented it, and each had a collision function. Given that I didn’t plan to add more shapes, I instead created a SceneObject enum with Sphere and Poly variants.
#[derive(Clone)]
pub enum SceneObject {
    Sphere(Sphere),
    Poly(Poly),
}
I then implemented my original Collidable trait for the enum, which simply matched and called the same function on the underlying type.
impl Collidable for SceneObject {
    fn ray_intersect(&self, ray: &Ray) -> Option<Intersection> {
        match self {
            SceneObject::Sphere(sphere) => sphere.ray_intersect(ray),
            SceneObject::Poly(poly) => poly.ray_intersect(ray),
        }
    }

    ...
This is a little boiler plate heavy, and there is probably a macro for this pattern, however the results were a nice surprise, 48154ms. I was really not expecting this big of an improvement. Another reminder for me that guessing about performance is a bit of a dark art, and you really have to measure all the changes you make.
Clone
It’s quite common in Rust to just Clone objects rather than deal with complex lifetimes and references. Often this is fine and the performance cost is worth it for the simpler code. Chasing performance made me look closely at one of the larger clones I was doing. I have a struct called IntersectionResult that contains information about a ray colliding with an object, and crucially, it stores a clone of the scene object.
struct IntersectionResult {
    intersection: Intersection,
    target: SceneObject,
}
This was a quick hack at the time, as it wasn’t immediately obvious how complex the lifetimes would get, especially with the usage of dynamic dispatch. With that optimised away though, it was time to look at the clone. I stored a reference to the scene object, and restructured some of my code to make the borrow checker happy. It wasn’t a big job, but it shaved off a nice 3 seconds, bringing us down to 45189ms.
struct IntersectionResult<'a> {
    intersection: Intersection,
    target: &'a SceneObject,
}
Multithreading
Earlier on I mentioned that I was using 20 threads to render the image. I initially did this in a very crude way, as I just wanted something workable to let me iterate far quicker than I could with a single thread.
My first version simply split the pixels into 20 chunks, the last chunk potentially being smaller, and threw each chunk at a thread. This is a fairly simple approach, but had a fairly big problem that I knew about early on. Not all chunks are created equal. Some result in paths that take far more compute time than others, with fewer oportunities to early out a long a given light path.
This resulted in each thread finishing at significantly different times, and there could be a huge time difference between the fastest and slowest thread. Essentially the program would end up waiting a long time for the thread working on the last chunk while the other 19 threads were idle.
I decided to solve this by having a much larger number of smaller chunks. That way the final thread working on the very last chunk would have far less work to do, leading to less idle time overall. This requires more sophisticated code, as the number of chunks or even which chunks a given thread will process is not knowable from the start.
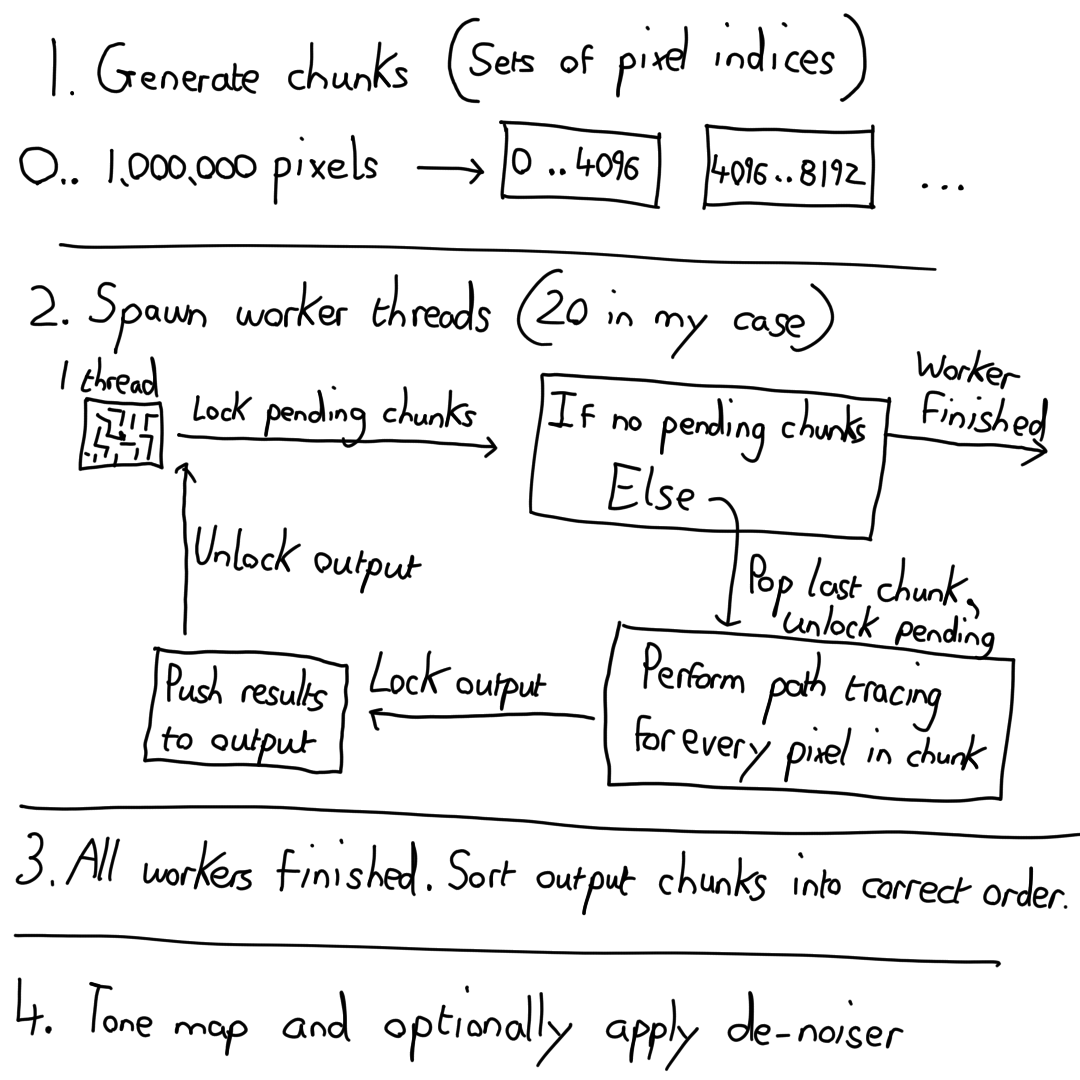
In the original version, I simply gave each thread a chunk, and once complete, the thread would return the pixel results for that chunk. In the new version, I opted for the following structure.
let raw_results: Arc<Mutex<Vec<(Vec<PixelData>, usize)>>> = Arc::new(Mutex::new(Vec::new()));
If this looks a little intimidating, don’t worry, we’re going to break it down.
- Arc = Atomically Reference Counted. This is essentially a thread safe smart pointer to immutable data.
- Mutex = An object that only allows one thread to obtain access to it’s contents at a time by locking the mutex.
- Vec = An array type that can grow in size.
- (Vec<PixelData>, usize) = A tuple that contains a Vector of PixelData objects, and a usize. I’m using the usize value here to sort the chunks after processing on the worker threads.
Whenever a thread finishes working on it’s current chunk, it obtains a lock to the Mutex inside the raw_results pointer, writes it’s results along with the index of the first pixel for sorting purposes, then frees the mutex. It then locks a second Mutex I have that stores a list of remaining pixel chunks that need processing. If there are no remaining chunks to be processed, the thread exits.
Once all the threads have exited, the work is done, and we do some final post processing like tone mapping on the master thread. This multithreading improvement saved around 4 seconds in the test case, bringing us down to 41474ms.
Axis Aligned Polygons
The scene I’ve rendered is similar to a cornell box, and in that way it has some features that are not common in more generalised rendering. It has five polygons that make up the walls and floor. These polygons have the special property that each is aligned to a given plane in world space. As an example, the ground plane is perfectly parallel to the xz plane, as the y value for every vertex is the same.
My previous trip into spatial partitioning was a failure due to the low number of scene objects in my scene. This is also not common, so I decided to take advantage of having 5 axis aligned planes, and improve the collision code for them.
Using the ground plane as an example, we can take the origin of a ray and it’s direction. If the ray begins above the ground plane, and does not have a negative y value, it can never intersect. This is a very quick check to calculate and had a huge impact on performance. After enabling this optimisation, the time was down to 31508ms.
Denoising
I’m hestitant to talk too much about this as my verison is buggy and I need to look deeper into the topic. For the purposes of generating a video, I needed significantly more performance, and a denoiser is one commonly used way of achieving that when it comes to path tracing. The idea is you shoot far fewer rays which is much faster to compute, and then use a good denoiser to clean up the image.
A denoiser that only operates on the final pixel colour results in bad blurring between objects, especially on reflective surfaces. As such, I implemented a crude edge aware denoiser. The denoiser has access to the material properties, surface normal, and collision point for each pixel. Using this information, you can help reduce bluring across object edges, and customise how much denoising to apply to different surfaces, less for highly reflective ones in my case.
The video clearly shows the flaws, but at least I was able to render it in about 3 hours as opposed to 3 days.
Future work
I think I need a break after spending a month of weekends and evenings on this, but I would certainly like to come back, improve my denoiser, and implement transparent objects. One of my original goals was to figure out the feasibility of using path tracing in real time in a 2d context. Now I’m more aware of the available optimisations and the kinds of performance, I’m fairly convinced it can be done, even on the cpu, though in all likely hood I would create a shader version.
I’m not releasing the code yes, as it’s confusing and full of partial implementations of different optimisations that need cleaning up. I’m also fairly sure I have an issue with energy conservation, given how sensitive the tone mapper appears to be with different lighting setups, and this requires a deeper investigation.
Hopefully you enjoyed this brief overview into the topic. I’d encourage anyone who is new to graphics programming to give a CPU path tracer ago. You need almost no external dependencies, and tweaking the numbers and behaviour is very addictive.